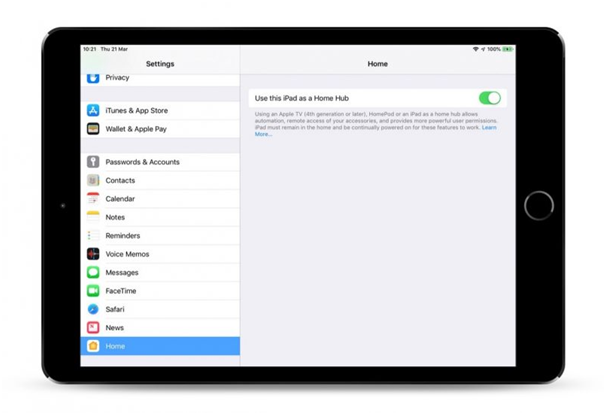
iPad works as a Home Hub for Apple’s HomeKit devices
Step by step method to set up Home Hub on iPad

With Apple’s HomeKit framework you can now easily control compatible connected smart devices that you have installed in your home using the Home app on iOS. There are some features of HomeKit that require you to designate a device as a Home Hub, which remains powered on and connected at your home when you’re away. Setting up a Home Hub has its own advantages as it allows you to use location-based automation features. This works if your HomeKit devices support them like some thermostats can change the temperature to something more economical whenever you leave your home by using a virtual geofencing.
You can even take the help of Siri for your Home Hub to trigger actions when you are away from your home. Like if you’re leaving the office, you could ask Siri to increase the temperature of a connected thermostat or switch off your light.
Setting up Home Hub on iPad

Your iPad can be used as a Home Hub just the same way as you use Apple TV and Homepod. Here is step by step guide to set up your Home Hub on your iPad device.
- First Launch the Settings app on your iPhone or iPad.
- Now Scroll down and tap Home.
- You will see that its off so you have to Toggle the switch to the green ON position next to Use this iPad as a Home Hub. You can check the status of your home hub to see if it’s connected in the Home app on your iOS device.
- Tap the Home icon in the upper-left corner of the screen. (If you have multiple homes set up, tap Home Settings next, then tap a home.)
- Now look under Home Hubs to see if your home hub is connected.

Once you’ve set up your home hub, you’ll need to enable two-factor authentication on your iCloud account, otherwise you won’t be able to remotely access your HomeKit accessories.
Now that you have everything set up, the next time you’re away from home you can give Siri commands on your iOS device to trigger actions, which will obviously depend on the sort of accessories you have installed. You can “Turn on the living room light” or “Open the garage door,” or you could ask Siri to check the temperature of a thermostat or any other task you list in your home hub to work for you.
Home app- Points to know before you begin

As said above the Home app lets you control any “Works with Apple HomeKit” accessory. You can also control your home with Siri. Or set up home automations and let the Home app do all the work for you. You can share control with family and friend and get notifications about the activity in your home so you never miss a thing.
Remember you should update the iPad or iPhone with latest version of iOS to use Home app. Also make sure that you have one or more HomeKit-enabled accessories. Look for the label “Works with Apple HomeKit” on the product packaging.
To use and manage your home in the Home app on all of your devices, sign in to iCloud with your Apple ID on every device. Then turn on iCloud Keychain and Home in iCloud Settings.

- To get started with Home Hub you need to Set up your HomeKit accessories in the Home app on your iOS device.
- To set up automations, change user permissions, or stream HomeKit-enabled cameras remotely, you need a HomePod,2 an Apple TV 4K or Apple TV (4th generation) with the latest version of tvOS, or an iPad with the latest version of iOS.
- To control your HomeKit accessories remotely, you need a HomePod, an Apple TV 4K, Apple TV (4th generation), Apple TV (3rd generation), or iPad.
The device that you set up as a home hub must remain in your home, connected to your home Wi-Fi network, and powered on.
Note that Apple TV (3rd generation) doesn’t support remote access for shared users or remote access to HomeKit enabled cameras and HomePod and Apple TV aren’t available in all countries and regions.